Dinghy Repair Spars - Boom and Mast
Go To: Sailing - Dinghy Repair
Posted on 26 November 2008 17:49
Spars are pretty important on a boat - without them, there's nothing to hold the mast up! Different masts require different actions and maintenance, and we're going to be considering aluminium masts in this article.
There are plenty of older boats around that have wooden masts, although not so many new builds these days, so we'll look at these in a later article if needed. Unfortunately our club is so small we've not got an carbon fibre masts lying around, so we can't do any articles on those, unless anyone wishes to write a guest article for us which they're more than welcome to.
As with much of our Laser 2, there was not a whole lot wrong with the spars (i.e. the mast and boom). At first glance, the main thing appeared to be that they were just a little dirty. There was some work to be done with the standing rigging however, which we'll now talk about.
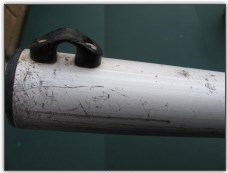
Photo 1, The boom end

Photo 2, Boom after cleaning
Cleaning the boom
Aluminium masts and booms are anodized; this is a particular finish given to them, using a chemical reaction to coat them with aluminium particles. When they get quite heavily scratched, as ours have, there's not a lot you can do - paints such as hammerite aren't very good for painting over with because they can be quite thick, and will flake off easily. On ours, it appeared as though the surface of the aluminium had become pitted; we tried lots of things to remedy this, but the only thing we found that worked (even better than brillo pads which didn't work at all) was a general purpose metal cleaner, which works by taking a thin layer off, but not enough to make it worse.
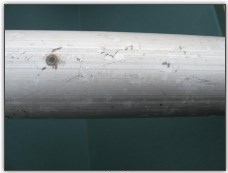
Photo 3, Pitted boom, before cleaning
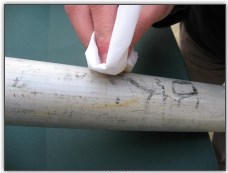
Photo 4, Cleaning the boom
This is quite pungent stuff, and this kind of work should be done outdoors, wearing latex gloves (as long as you aren't allergic or that's a fun trip to the hospital for the afternoon), and a facemask if you'll be doing it for a long period of time. We worked in stages, applying it to a tissue, wiping it on and leaving it for a minute or two, and then wiping it off with a fair amount of elbow grease applied. This seemed to take off the pitting quite well as you can see in the photos. The only other work we did to the boom was to remove a few old rivets which had been badly trimmed. They were drilled out and knocked into the boom, then we just turned it upside down a few times until the rivet pieces dropped out of the gooseneck hole.
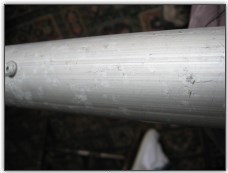
Photo 5, Pitted boom, before cleaning
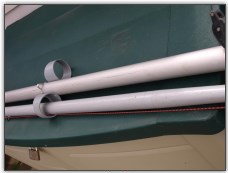
Photo 6, Our newer boom and pole
The hour or so we spent cleaning the boom we initially thought well spent; it came out looking cleaner and shinier than it started. Yes - shinier, this is important! It's not just about aesthetics. If a piece of metal is shiny and smooth, with no surface marks, dirt or imperfections, it has less resistance when moving through the air. We're only talking tiny amounts of difference here, impossible to prove that it's made a difference, but it sure does look better too. And of course, if you have dirt on a piece of metal, especially metal that's already pitted, it's only going to get worse; prevention instead of cure is the best way, but it does depend on how much time you want to spend on your boat! The unfortunate truth is because we spent so much time on our boat the first half of this year, we barely sailed it and didn't race it until July. We'll just have to make up for lost time in the autumn!
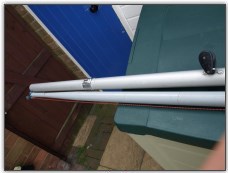
Photo 7, Our newer boom and pole
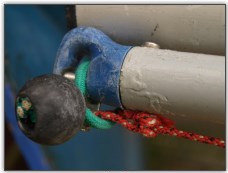
Photo 8, Pole end, showing slight age
I said we thought the time was well spent, and it was. However, that boom has now become our spare - several weeks after cleaning it up, we came across a Laser 2 boom and spinnaker pole on Ebay, which we eventually got for the enormous sum of £22 plus travel down to Queen Mary Sailing Club in London, which as you can see in Photos 7 and 8, are in better condition than the boom we initially had, and furthermore we didn't have a spinnaker pole to this point. The only work we've done on the new additions is to replace the rope on the spinnaker pole, since it was fraying around the mid section where it goes through a metal fairlead, we've also wrapped electrical tape around the fairlead/bullseye at the midpoint to stop it fraying the replacement rope. Should come in handy if we ever get to use the spinnaker...
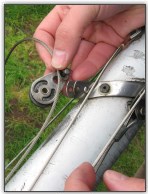
Photo 9, Replacing the top jib block
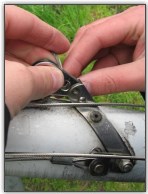
Photo 10, Replacing the top jib block
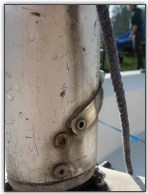
Photo 11, The bottom of the mast
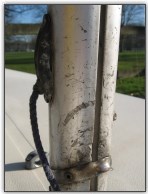
Photo 12, Bit old, but it still works
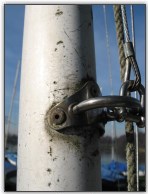
Photo 13, Needs a bit of a clean still
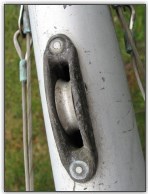
Photo 14, The spinnaker sheave
Tending to the mast
As for the mast, we had a few items to replace. The turning block the jib halyard moves through was damaged, and we replaced it with a spare from our toolbox, in a nice and easy 2 minute job.
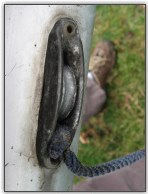
Photo 15, The main block sheave
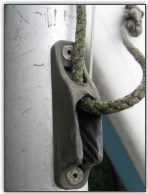
Photo 16, The jib cleat
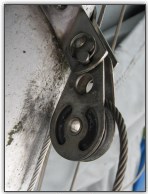
Photo 17, Replaced top jib block
What wasn't a two minute job however was replacing the pulley blocks for the main halyard, and for the spinnaker. The main halyard block was in pretty bad condition - it wasn't the original block either, so had taken some damage. When these mast blocks get damaged and worn, it just makes the mainsail harder to pull up the mast, and you risk damaging other things. Back to this in a moment though.

Photo 18, The spreaders, bit green!
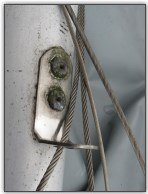
Photo 19, Odd securing point for the jib on a laser 2
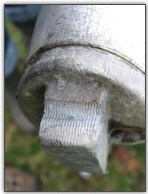
Photo 20, Mast step, slightly grated
Before we replaced the main block, we decided to replace some of the standing rigging. First of all, the forestay wire was starting to fray at the end. We found a replacement Laser 2 forestay wire for £7 on Ebay, but didn't go for that in the end. Upon examination we also realised we needed to replace the main halyard, since the wire had a bad kink in it which was weakening it, and the rope tail was nasty old dead rope. We could get the main halyard for a further £25, again off Ebay.
However.... the trapeze wires also needed replacing. They were badly kinked and deformed from years of not being used (unfortunately it appears they'll go that way again!). Due to the nature of the wires, they were not easily replaceable - they were attached via rusted metal "tangs" to a bolt that goes through the mast. The one could easily be taken off by unscrewing the nut on the bolt, however the bolt was also securing the top end of the diamond stay of the mast, so we couldn't take the other "tang" off without disassembling the diamond stay.
At this point we seeked professional advice, from Greg at Purple Marine, who advised that to replace the tangs would indeed involve disassembling the diamond stay, which in turn would require removing the mast foot, and would probably cost more than the mast was worth. He suggested the alternative of clipping off the old trapeze wires, and shackling new ones to the tangs. The tangs themselves were not actually rusted, it was just the washer on the end of them. Being stainless steel, the tangs were still in good enough condition, and he's assured us that the shackles the new wires are secured on with will be strong enough.
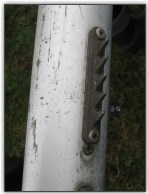
Photo 21, The rack for the mainsheet
We could have gotten the trapeze wires for £32 off Ebay (again), bringing it to a total of £65, and having to do the work ourselves; Purple Marine quoted us £60, so we got them to go ahead and do the work. Everything came back as requested, although sadly the new main halyard wire was about 3 inches too short, so we can no longer use the rack to pull the halyard up onto. It's too much hassle to take it back, and we dislike racks of this type anyway, so the final step was adding a Figure 8 style cleat on the mast.
Replacing mast blocks
After we got the mast back, we set about replacing the sheave blocks in the mast. It was fairly easy to remove the old one, by drilling out the rivet heads with a drill (Photos 23 and 24), then knocking them through and removing the sheave (Photo 25). We assembled the new one into place, and prepared to rivet. This is where the problems started...
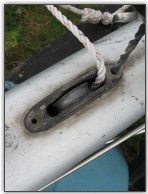
Photo 22, The old sheave to be replaced
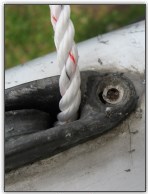
Photo 23, Drilling the old rivets
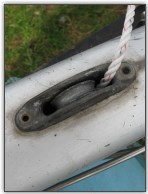
Photo 24, Closeup of a drilled rivet
As you can see from the pictures, there is a fairly large hole for the rivet in the mast - this block has been riveted back in at least once, and the hole widened. None of the rivets we initially tried were large enough, and resulted in the block pulling straight back out. Cue a trip to the local DIY store to get some larger rivets. That wasn't the worst part though...

Photo 25, The sheave out of the mast
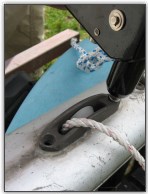
Photo 26, Cleaned up, riveting in the new sheave
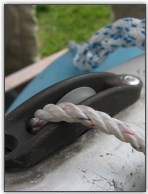
Photo 27, One rivet done
Part way through trying to rivet this in (Photos 25, 26 and 27), one of the guys from our club needed our mast moving to get a vehicle into the boat park. He very carefully lifted up the mast I was working on without dislodging any parts... however the top half of the mast was lying on the floor, trapped the halyard, and as he moved the mast the halyard rope tail disappeared through the pulley block... into the mast. Definitely not intentional on his part, and he's made up for it in other ways since, but damn annoying at the time.
Never having had to thread a halyard back through a mast before, this took some thinking through. I initially tried adding some nuts onto the halyard (added weight) and dropping it through from the top of the mast. This worked, but only got to a certain point before it would go no further. The next attempt was tying the same nuts as weight to a piece of 2mm cord, and trying to drop that through. However, once again the friction of the cord on the mast, and the weight of the cord itself caused too much drag, and they wouldn't drop through.
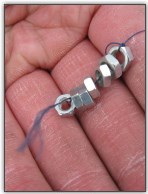
Photo 28, Attaching bolts to a length of cotton
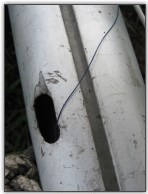
Photo 29, The cotton entering the hole in the mast
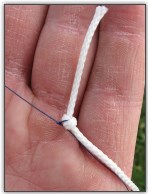
Photo 30, Tying the cotton to the cord
Finally, we figured the right way to do this, and a handy hint for anyone trying. The weight idea is right - you need something to pull the rope through - but the best and easiest way is to attach the nuts to a long piece of cotton (Photo 28); we had a reel of cover thread, a fairly heavy weight cotton, but still cotton. About 15 small nuts attached to that, the cotton was dropped from the top of the bottom section of the mast straight through (Photo 29), and dropped all the way to the bottom, and straight through the sheave hole. Success! It was a fairly quick operation from here, but still needs to be thought through... the cotton was too thin and weak to attach to the main halyard rope (3-ply 4mm nylon) to pull through and would snap, so the end of the cotton was attached to a length of 2mm lightweight cord (Photo 30); use whatever knots you need to make it secure, just don't make the knot too large; you can even burn them together if you wish. The cord then pulled through easily, then the end of the cord was tied in a similar way to the end of the halyard rope, and that pulled through (Photo 31).
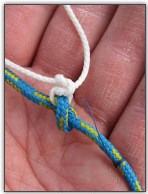
Photo 31, Securing the cord to the spinnaker halyard
A whole lot of pain... but now we know how to do it. Several weeks later, we again had the same situation when yours truly forgot to put the rope stopper back on, and we lost the main halyard again. This time it only took ten minutes to demast, rethread and remast, even with the halyard block in place this time, so less nuts had to be used as weight.
So, we were discussing riveting... after fetching larger rivets, we riveted the lower block in. This held for about 4 months, until we were trying to raise a new second hand sail we got (again off Ebay), and after pulling a little too hard, pulled the entire sheave assembly out of the mast again. After that incident, we got even bigger still rivets, and now it shouldn't come out again. If it does we'll consider bolting it in, but that will be very difficult due to the location.
With the new block in place, the sail raises much better. At the same time as replacing the lower main block, we also reset the spinnaker block; the spinnaker assembly on the Laser 2 only has one, just above the turning block for the jib. We didn't replace this block as it was in better condition and didn't take as much force on it; we had to rig it though, since there was no spinnaker rigging on the boat when we purchased it. We used a 3mm braided rope for the halyard, and once again, used a piece of cotton to initially thread it through; this time working from the bottom upwards. The mast on the Laser 2 has a sleeve inside it where the spinnaker halyard comes out of the lower mast; we threaded the cotton through this small hole and up the mast, and through the hole where the sheave block was at the top of the mast. After that it was a small matter of rivetting the block back in place.
New halyard cleat
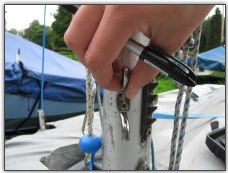
Photo 32, Marking the holes to be drilled
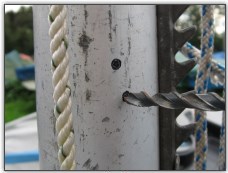
Photo 33, Drilling the first hole
A new halyard cleat
As mentioned previously, the new main halyard wire wasn't quite long enough, so it no longer reaches the rack. Instead, we've riveted on a new Figure 8 style horn cleat. First, we marked on the mast where the holes would be drilled (Photo 32), then drilled the first hole (Photo 33). Once we had one hole drilled, we dry fitted the first rivet (Photo 34), then drilled the second hole before the first rivet is secured - this is the easiest way to ensure you get two holes in the right places.
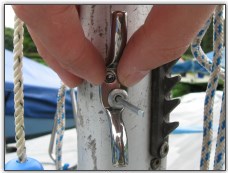
Photo 34, Dry fitting the first rivet
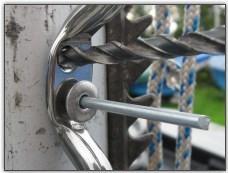
Photo 35, Drill the second hole before the first rivet is secured
Next, we secured the first rivet (Photo 36), and then the second rivet (Photo 37). We used large rivets because this fitting will have a fair amount of force on it, and we don't want to be coming back to do this again at a later point. Plus, it's not very easy to read sail numbers of competing boats if the fitting flies off and the mainsail collapses on the helm and crew mid-race! In Photo 38 you can see the main halyard neatly cleated off.
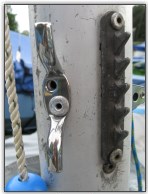
Photo 36, Secure the first rivet
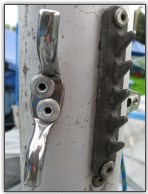
Photo 37, Secure the second rivet
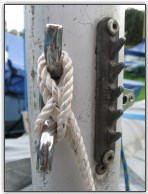
Photo 38, The main halyard neatly tied off
Summary
We learnt quite a lot working with our boom and particularly our mast, especially how to get a halyard up a mast. As for replacing the block, there are other options to try if your sail won't easily run up your mast - the first thing to check is that the luff groove of the mast is clear from obstructions, and don't forget to check the luff of the sail isn't frayed; on boats with full width battens, such as 420's or Laser 2's, the luff has the tendency to fray or even rip and open up around where the top full length batten meets the luff.