Laser 2 Rigging Guide
Go To: Sailing - Rigging Guides
Posted on 02 May 2010 14:53
The Laser 2 is a two person dinghy, which comes in various different configurations, some with trapeze, some with spinnakers, some with both. There are a range of names for them, from Regatta, Fun, and Fun New Wave amongst others. With an ideal crew weight between 120-170kg, it's an ideal boat for mixed crews and younger sailors.
The Laser 2 was launched in Australia and North America in 1979, then Europe in 1980. It was designed by Frank Bethwaite, whos family are also responsible for other high performance boats such as the 29er, 49er and B14. It's still fairly popular with University racing in the UK, as it's open handicap popularity has dropped in recent years with the launch of the newer asymmetric ranges from Laser, Topper and RS. The Laser Vago is considered to be the replacement for the Laser 2.
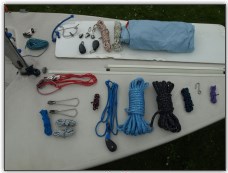
Photo 1, Parts laid out
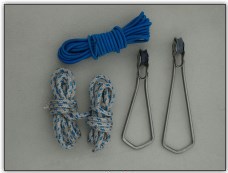
Photo 2, Trapeze parts
As far as rigging guides go, sit tight because this is going to be a big one! We've got the spinnaker trapeze version, and are going to rig it all up. We have 102 photos in all to show all the steps, so here we go.
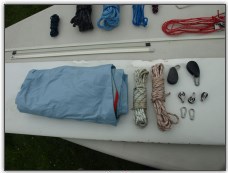
Photo 3, Spinnaker parts
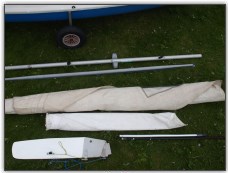
Photo 4, Sails, spars and foils
1. The Parts
- Hull
- Mast + Shrouds and Forestay + Trapeze Wires
- Boom
- Main Sail + Battens, Jib Sail, Spinnaker Sail
- Rudder + Tiller + Tiller Extension
- Daggerboard
- Outhaul
- Downhaul
- Kicking Strap (various arrangements available, ours uses 2x double pulleys)
- Inhaul
- Clew Tie Down + Hook
- Painter Rope
- Trapeze Bungee + Height Adjuster Ropes
- Trapeze Handles + Cleats (these vary boat to boat)
- Traveller / Hawse
- Main Sheet
- Jib Sheet
- Spinnaker Sheets (one red and one green)
- Spinnaker Halyard/Downhaul
- Spinnaker bag
- Pulley blocks (traveller x1 double, main sheet x2, spinnaker sheets x2, spinnaker halyard x3 etc)
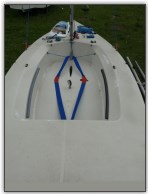
Photo 5, The hull and cockpit layout
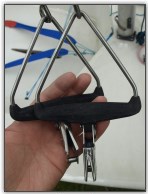
Photo 6, Trapeze handles
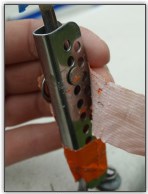
Photo 7, Shroud adjusters
That's a pretty long kit list we have this time! If you're buying a Laser 2 second hand (which chances are you will be as there are very few new ones), make sure you know what you're getting with the boat. It's always good to have a spares box at hand when rigging up for the first time, chances are something will be missing. If the list above looks quite daunting, then remember that some of it's already attached; there's a good chance all the trapeze wires, handles and adjustors will be hooked up ready to go. We're rigging up a spinnaker trapeze version here - it's quite possible some of the above won't apply to your boat, depending on the model.
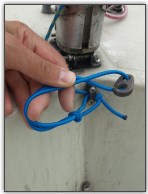
Photo 8, Centreboard retaining clip
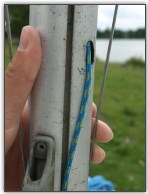
Photo 9, Spinnaker halyard
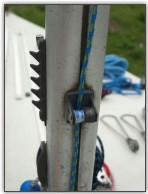
Photo 10, Spinnaker halyard cleat
There are also some Laser 2's that come with spinnaker chutes through the foredeck into the cockpit, and some quite rare examples with asymmetric spinnakers (and also a one off quite mad conversion that uses a 29er asymmetric spinnaker). We won't be demonstrating any of this as we don't have any available.
2. The Mast
We're going to start with the mast already up. The mast on a Laser 2 is in two halves - the top half is about 6 feet long, and slides into the lower half - but make sure the main sheet halyard goes down the same side of the mast as it comes up. Before you continue, make sure the end of the main sheet halyard you attach to the sail is pulled all the way down.
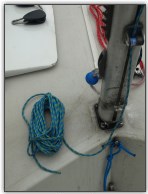
Photo 11, Spinnaker halyard
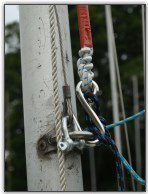
Photo 12, Spinnaker uphaul
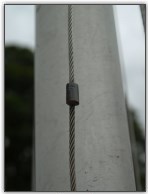
Photo 13, Jib cleat
It's pretty easy to get the mast up - one person lifts it up and lowers it onto the mast step on the deck - make sure both the deck step and the bottom of the mast are clean. Hold the mast steady, while a second person attaches each shroud in turn, and then the forestay to the fitting on the front of the deck. It is possible to do this solo - the best way we've found is to attach one shroud and the forestay while the mast lies on the ground, and it should then stay up in place while you attach the other shroud and tighten everything up.
3. The Trapeze
Now the mast is up, let's start with the trapeze, as it's easiest to do without the sails in the way. This is a single trapeze on this boat, one on either side for the crew. If you have them they should already be attached to the mast, and shouldn't be taken off, as you will have to remove the diamond shroud to do this, and won't get it back on after! There is a piece of elastic bungee that goes from the bottom of each handle, around the front of the both, to keep the tension on the handles and pull them forward out of the way. To start, thread the elastic through the micro block on the front of the deck (Photo 14), and pull it through to get equal lengths on each side. You can get double micro blocks - you should use the bottom sheave.
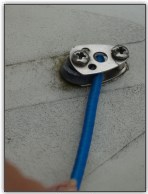
Photo 14, Insert the trapeze elastic
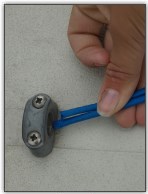
Photo 15, Through the bullseyes
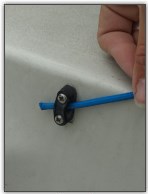
Photo 16, Into the cockpit
Next, hold the ends together, and thread them through the fairlead in front of the mast (Photo 15). They then split, one going to each side. There is a fairlead inside the cockpit on the front side that it should lead through (Photo 16), and then for now, tie a quick knot in it, to hold it here (Photo 17), and do the same for the other side.
Next, assemble the trapezes with their handles. You can get slightly varying handles, We have v-jammer adjustors on them. Tie the trapeze adjustor rope (should be about 60cm / 2 feet long), onto the bottom of the jammer with a bowline (Photo 18), then take it around the pulley block of the handle (Photo 19), back through the jammer and tie a knot in the rope to stop it coming out, as shown (Photo 20).
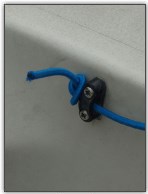
Photo 17, Tie it off for now
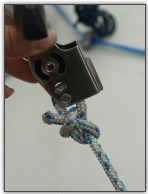
Photo 18, Rope adjuster on the trapeze handle
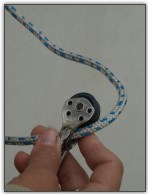
Photo 19, Through the handle
Now, take the end of the trapeze bungee, un-knot it, and secure it around the trapeze handle (Photo 21). We've used a slightly altered round turn and two half hitches, feeding the working end through one of the turns - this stops the elastic slipping through so easily (Photo 22).
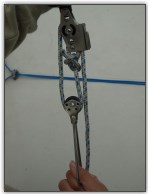
Photo 20, Completed adjuster
Photo 21, Secure the trapeze elastic to the handle
Photo 22, Secure the trapeze elastic to the handle
Photo 23, Attach the jib to the front ring

Photo 24, Clip the jib on
4. The Jib
The jib is next - make sure your jib halyard is free of any other lines (e.g. the spinnaker uphaul or halyard). Attach the front bottom edge (the tack) of the jib to the front loop of the boat using a shackle. We have to clip our jib onto the forestay along it's luff, but not all Laser 2 sails have these (in fact class legal ones don't).
Photo 25, Attach the jib to the halyard
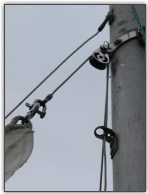
Photo 26, Hoist the jib, and clip the jammer in
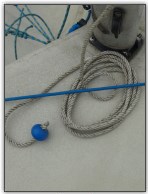
Photo 27, Neatly coil the halyard
Attach the end of the halyard onto the top of the jib with a suitable shackle (Photo 25), and hoist it. We've used a slightly different jib here, it's not Laser 2 class legal, and is ever so slightly smaller, hence the number of shackles on the top to make the wires fit. The Laser 2 has a crimp on the wire part of the halyard - which you can see in Photo 26 if you squint or without squinting in Photo 13 - this has to be fed through the metal fitting shown, and pulled towards the mast to hook it on - you may need to pull on the forestay to give you some extra slack to clip it in. The jib should then stay up - but we had to experiment with shackles to get the fit right. Coil up the halyard rope neatly (Photo 27) - this can be stowed on the deck or in the cockpit - we've got a nice neat solution of two halyard bags, as you can see in Photo 82 at the bottom of this rigging guide. In fact, these are just two see through pencil cases that we managed to attach to the front of the cockpit using shackles and the fairleads.
Photo 28, Jib clew
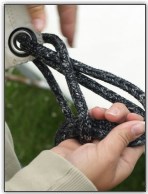
Photo 29, A bad way to attach the jib sheets
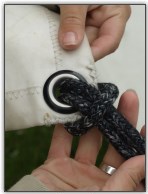
Photo 30, They get twisted easily this way
To finish the jib, attach the jib sheet to the jib clew (Photo 28). The method we've shown here first is a lazy method - fold the rope in half, pass the middle (bite) through the jib clew, then pass the two ends through the middle of the bite (Photo 29), and pull it tight (Photo 30). This is a quick way of doing it, but we've found that when sailing, the two jib sheets tangle up and wind around each other very quickly. They can be fairly easily untangled by sheeting in the jib tight, but the better way is to put a stop knot half way down the length of rope (Photo 31).
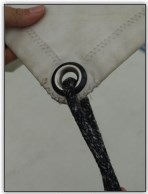
Photo 31, Better way - equalize the jib sheet
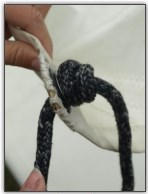
Photo 32, Stopper knot one side
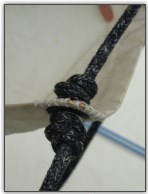
Photo 33, Stopper knot the other side
Pull it through the jib clew until the knot is against the clew (Photo 32), then put another stopper knot in the other side of the clew, as shown in Photo 33. For some reason, jib sheets tend to tangle slightly less this way, we find. Finally, feed the ends of the jib sheets through the bullseyes (Photo 34), then into the cockpit (Photo 35). Inside or outside of the trapeze lines is the question - the answer is personal preference. The jib sheets need to come inside of the shrouds on the Laser 2, to allow you to sheet the jib in tightly enough.
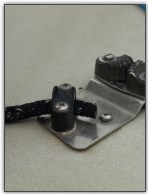
Photo 34, Jib sheet through the jammer
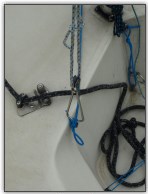
Photo 35, and into the cockpit
5. Traveller
The traveller is quite easy - take the rope for the traveller, put a small bowline in one end of it, thread the working end through one of the bullseyes/fairleads on the back of the deck, thread it through the smaller block of the two joined blocks (ours are taped together), through the other bullseye/fairlead, the working end through the bowline (as shown in Photo 36), into the cockpit, and through the jammer cleat (Photo 37). Don't forget to put a stopper or figure eight knot in the rope to stop it coming back through (Photo 38).
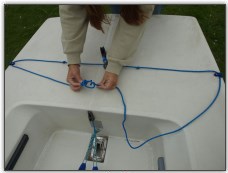
Photo 36, Attach the hawse or traveller

Photo 37, Lead it into the cockpit
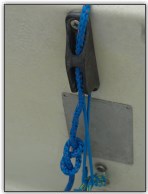
Photo 38, Jam the traveller line
6. Outhaul
To start the outhaul, secure one end of the line to the bullseye on the end of the boom (on the top), using a bowline (Photo 39). Take it through the smaller side of the stainless steel hook (Photo 40), then back through the bullseye (Photo 41). This line then leads along the top of the length of the boom, and through the jammer cleat on the top of the boom (Photo 42). Again, put a stopper knot in it, and the outhaul is done. If you're not rigging race legal, you could do a different outhaul arrangement, with blocks for a multi-purchase system like we use usually, as our club doesn't worry about race legal, but if you're up against other Laser 2's, you should use this class legal standard outhaul.
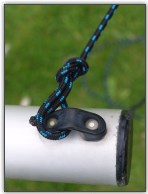
Photo 39, Start the outhaul with a bowline
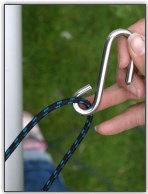
Photo 40, Take it through an S-hook
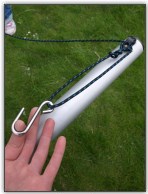
Photo 41, Back through the first fairlead
7. Main Sail
Unfold the main sail (Photo 43), and get the battens ready. Insert each batten into it's correct batten pocket (Photo 44), and seal them in. On some sails this is just tucking the batten into a fold of the edge of the sail, on this sail we have velcro pocket ends, to stop the battens coming out as shown in Photo 45 (as they don't readily float, as we found out with our Merlin Rocket ones after a capsize!).
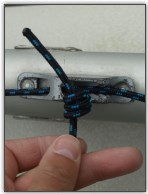
Photo 42, Along the boom into the jammer cleat
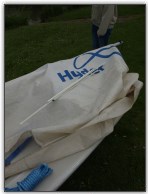
Photo 43, The main sail
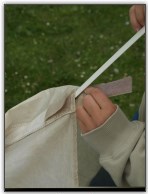
Photo 44, Insert the battens
To raise the main sail, attach the halyard end to the top of the sail, using a suitable shackle (Photo 46) - at this point you may wish to add a masthead float or a few plastic bottles to stop you inverting (as Laser 2's have a reputation for inverting quickly). Slide the sail luff bolt rope into the mast slot (Photo 47), and as one person feeds the sail in (Photo 48), the other should pull on the halyard end that comes out of the bottom of the mast, to raise the sail. If it's difficult to pull up, check the following:

Photo 45, Ensure the pockets are sealed securely
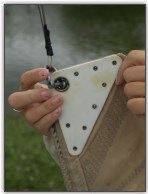
Photo 46, Attach the halyard
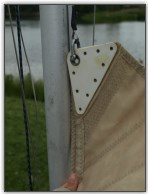
Photo 47, Insert the bolt rope into the mast slot
1. The sheave block at the top of the mast, and at the bottom where the rope comes out should freely roll. If they are stiff or rusted, you will struggle, and should consider replacing them. We had to send off to the USA for replacements for the lower one, but it makes an incredible amount of difference. Try a simple oiling first though, don't immediately replace them.
2. If the sheave is ok, and the bolt rope is a little swollen/rough, try some silicon spray along the luff, this should make it easier to hoist.
3. Check the top of the bolt rope, next to the head of the sail, is tight and not frayed. If necessary, use a sharp knife, such as a craft knife, to cut the lose fraying rope off, then try to seal it with a flame.
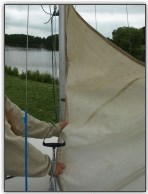
Photo 48, Carefully hoist the sail
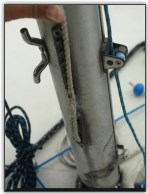
Photo 49, The rack for the main halyard
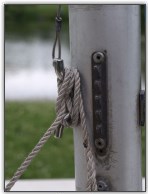
Photo 50, The halyard cleated off instead
For a standard Laser 2, you should be able to pull the halyard all the way out and expose the end of the stainless steel rope part of the halyard (Photo 49), then hook the wire loop onto one of the teeth on the halyard rack. Depending on conditions you should increase tension on the mainsail by hooking onto a higher tooth. Unfortunately when we had our main halyard wire replaced (as it was fraying), the replacement wire was not quite long enough, so we've had to add a stainless steel figure 8 cleat on the mast, just to the side of the rack (Photo 50). This however is still class legal. Finally, loosely coil up the rope and stow it - we've added halyard bags to pop this into, which you'll see later.
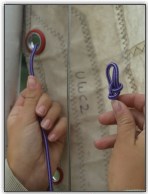
Photo 51, Starting the downhaul with a bowline
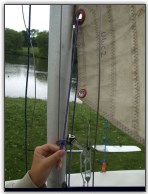
Photo 52, Through the sail
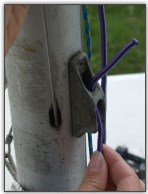
Photo 53, Through the top of the jammer cleat
8. The Downhaul
Next comes the downhaul - the purple rope on our boat. We've used lots of different colour pieces of rope to make it easy to tell which rope each one is, and this one is purpe. Start by tying a bowline in the end of the rope , then feed it through the cringle in the front of the main sail (Photo 51) - you should use the upper one (Photo 52), as you won't be able to pull the sail down much with the lower one, which should be used as a sail inhaul. As shown in the picture, get relatively equal lengths of rope either side of the sail. Next, with the working end, feed it upwards through the jammer cleat (Photo 53) just under the boom so it comes around the top edge of the cleat without touching the jaws, through the eyehole of the bowline (Photo 54), then back down through the jammer cleat, through the jaws. This now gives you a multi-purchase (2:1) downhaul, without using a pulley block, which is against class rules. Put the boom on the gooseneck, and this stage is done, as in Photo 55. Make sure the downhaul passes both sides of the boom as shown in Photo 56.
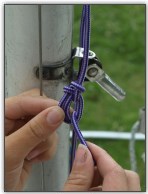
Photo 54, Back through the bowline loop
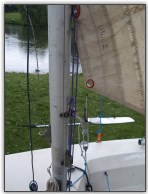
Photo 55, The completed downhaul
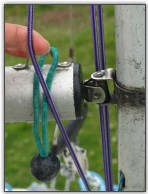
Photo 56, Make sure its either side of the boom
9. Clew Tie Down
We've added a quick and dirty clew tie down - just a length of rope passed around the boom and through the clew cringle on the mainsail a few times, secured with a reef knot, shown in Photo 57. You can come up with more elaborate solutions, but this is simple enough. Just make sure that it's not too tight, and the outhaul rope passes through the middle of it. You also don't want to trap the mainsheet if you've already added it by this point. Why do we need a clew tie down on a Laser 2? Much like the Laser 1, as it's a loose footed mainsail, if you don't have a clew tie down, when you let the outhaul off, the sail may have a tendency to rise up off the boom just lowering the boom, instead of forward along the boom giving it a more curved shape.
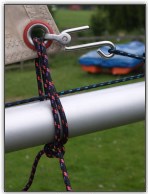
Photo 57, The clew tie down
10. Mainsheet
You probably will already have the correct block attached to the boom for the mainsheet, but if you haven't, it should be the black pulley with a becket. Attach it to the boom as shown, then start the mainsheet off the becket, using a bowline (Photo 58). We're using the 10mm thick blue and white rope (note this isn't standard Laser 2 issue but the class rules don't restrain you on rope types/thicknesses/colours). Take it through the larger top block of the traveller, in the front to back direction (i.e. through the front, and out towards the back) as in Photo 59, then back up and through the first pulley again (Photo 60), this time from the back through to the front. Take it along the boom, through the small fairlead (shown between the two spinnaker pole holders, Photo 61), through the final block on the boom (Photo 62), then through the block on the cockpit floor (Photo 63).
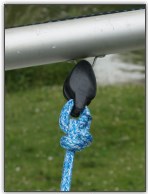
Photo 58, Start the mainsheet with a bowline
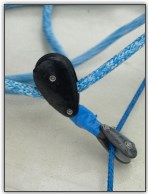
Photo 59, Through the traveller block, front to back
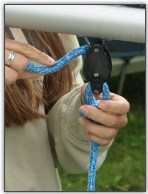
Photo 60, Through the boom block, back to front
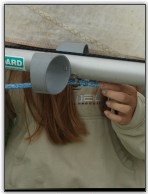
Photo 61, Through the fairlead on the underside of the boom
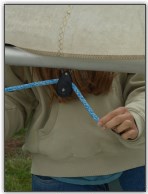
Photo 62, Through the last block on the boom

Photo 63, Through the cockpit ratchet block
It needs to go through the cockpit block in certain direction, that is, so the ratchet (when switched on), makes a noise as you pull the rope through as if you were sheeting in. You can see the complete mainsheet arrangement in Picture 64 (ignore the weed choked Mirrors in the background). Ideally, you should put a stopper knot in the mainsheet (Photo 65), so you can't lose it completely through the block (although if you have one long enough this is unlikely). Better still, pull the sail out until the boom is about two inches from touching the shroud, and put a stopper knot in the mainsheet just before it goes through the block - this will keep the boom from hitting the shroud, which can never be a good thing.
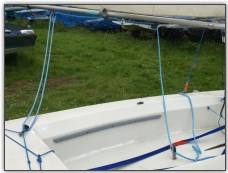
Photo 64, The completed mainsheet
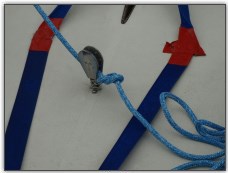
Photo 65, Tie a knot in it
11. Kicker
The kicking strap, such a necessity. Without it, we can't depower the sail when it's too windy. The one that comes as standard with the Laser 2 is pretty pokey, and to be honest, we couldn't figure out how the odd kicking strap block worked, so we replaced it with the one shown in the photos, which was actually found on the rigging DVD from the Laser 2 class association. Their video guide to it is pretty good, and easier to figure out than seeing it in photos, but we'll try.
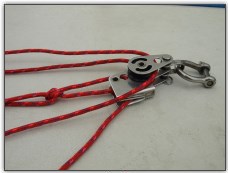
Photo 66, The kicker system
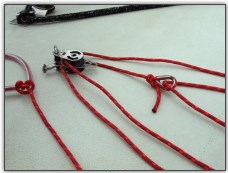
Photo 67, The kicker system
The class rules allow two double blocks, one with a jammer cleat on. You are not allowed to use any other pulley blocks in the system, and only one line is allowed, but you are allowed to use the line itself to create a multi-ratio system. How do you do that? With clever use of some knots and loops. You are also allowed to use rope protectors. Photos 66 to 68 show the setup of the kicker.
Start with the bowline around the becket on the jammer cleat (on the right). A bowline loop needs to be made around this becket, with one end going through the one pulley sheave on the other block, and then out the other end, ending in a bowline in a thimble. This knot must be as close to the metal thimble as possible - no gaps, or the rope will fall off the thimble. The other end of the line from the first bowline comes up to the thimble bowline, and through the centre of it, acting as a pulley. It then goes back down to the lower jammer block and around a block (not the jammer one), back up and around a block on the top block, then back down to the lower block, and through the block then jammer.
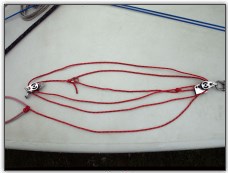
Photo 68, The kicker system
We've indicated the lengths of rope for each measurement in centimetres - this will take some adjustment on your boat depending on the size of your blocks, and how many shackles you use to attach things, so you may need to vary it slightly. It's important to put this all together next to the boat, as you'll need to adjust the position of the knot, as this controls how far apart the blocks will move, but also how close together the blocks will come. This pulley system is quite tricky - but worth the effort.
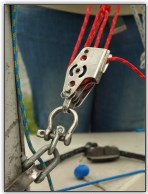
Photo 69, Attached to the mast
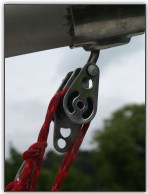
Photo 70, Attached to the boom
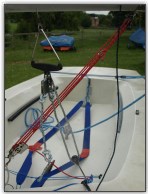
Photo 71, The complete kicker
Next, attach the kicker to the fixing point on the bottom of the mast (Photo 69). You may need a selection of shackles to get the kicker angled correctly - we've since changed ours to use a hook, as it's much easier and quicker to take on and off, but in the photo we've shown three blocks to change the angle enough. You can use a twisted shackle instead if you like. It's a good idea to be careful what shackles you use, as we found the shackle key handle was digging into the aluminium groove on the mast. The other end of the kicker should attach to the kicking point on the boom (Photo 70). While you're still rigging, remember to let the kicker run as slack as possible to depower the sail. The complete setup is shown in Photo 71.
12. Rudder and Centreboard
You can't sail a boat without it's foils... well actually, see our Centreboardless and Rudderless articles but it's pretty tricky doing both at the same time (especially in a Laser 2). In any case, it's much easier to sail with them attached. Next, we attached the rudder (Photo 72), by sliding it onto it's pintles. Our rudder is already setup with the lines attached, which you can see more information on in our article on rudder repairs, but basically, we have the bung attached to the rudder with a thin line (so we never forget it, as shown in Photo 73), and a downhaul on the rudder to allow us to pull it down while on the water. It drops onto it's pintles as shown, then the bung is screwed in. To finish off the rudder, insert the tiller into the top of the stop, and remember to pass the tiller extension under the back part of the traveller (Photo 74), but over the front part, as shown. Secure the tiller into the stock with a cotter pin, as shown in Photo 75, making sure this in turn is tied onto the stock.
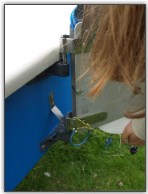
Photo 72, Attach the rudder
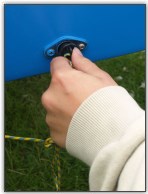
Photo 73, Remember the bung
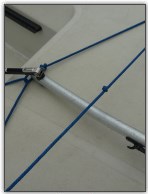
Photo 74, Add the tiller and tiller extension
Finally, add the daggerboard. On the Laser 2 it drops into the slot, which you won't be able to do on land. Ideally it should have a securing clip like ours on top, with a matching clip line secured somewhere in the cockpit (Photo 77) - ours is on the front. This stops it sinking or floating off when you capsize. Sorry, if you capsize.
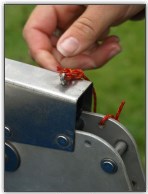
Photo 75, Secure the tiller to rudder
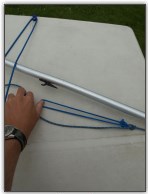
Photo 76, The rudder downhaul ready
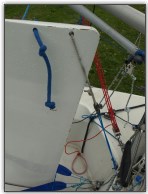
Photo 77, Add the centreboard and clip it on
The boat is now ready to sail, as shown in Photo 78! You could take it out just like this, and in fact, if it's your first time in a Laser 2, we recommend you do just that. Get used to it for at least a few hours first (unless you're a pretty spectacular sailor), and then come back for the spinnaker rigging part of this guide.
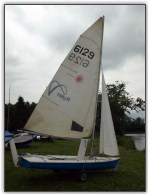
Photo 78, The completed boat (sans Spinnaker)
13. Spinnaker
This is the first rigging guide we've done with a spinnaker in, so sit tight, this is going to drag on a bit longer!
Most Laser 2 models have a classic symmetric spinnaker. There is one particular model that alledgely has an asymmetric spinnaker, but we can't find much conclusive proof of it, and there's also a one off where some nutter took a mast head asymmetric spinnaker from a 29er and modified a Laser 2 to make it fit. At least one of us at Caution Water is a bit jealous of that...
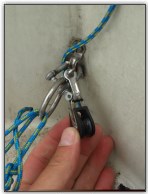
Photo 79, Block at front of the cockpit
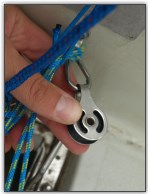
Photo 80, Block at back of the cockpit
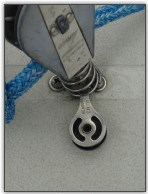
Photo 81, Block halfway down the cockpit
Chances are, you'll have a standard symmetric spinnaker model. It's a fair sized spinnaker, at 10 metres squared of sail, it'll keep you going at a fair whack down wind. Some models of the Laser 2 have a built in spinnaker chute running from the front of the deck to the front cockpit wall, but not all do, and if you have one that doesn't, you'll have to use a spinnaker bag, like we do. If you have a chute, it only makes a minor difference to this guide, and we'll point out where that is.
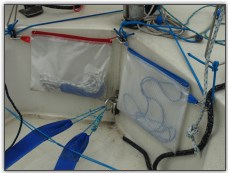
Photo 82, Halyard bags (non standard)
For more in depth articles on how to generally rig a spinnaker, see our series on spinnakers - it would be a good start to read that first. This is the Laser 2 version.
To start, we have a long spinnaker halyard/retrieval line. It goes into a sheave on the mast just above the jib block about 3/4 of the way up the mast, travels down through the mast, and exits just below the gooseneck, on the front of the mast (you can just about see it in Photo 9). There is no sheave at the bottom - just a hole. It then passes through a small jammer cleat on the mast (designed only to hold the spinnaker up, shown in Photo 10), and then starts traversing around the cockpit to turn into the retrieval line.

Photo 83, Spinnaker halyard and retrieval line
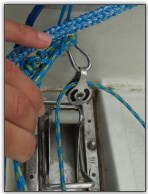
Photo 84, Spinnaker halyard and retrieval line
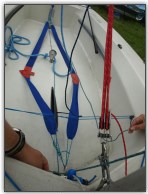
Photo 85, Spinnaker halyard and retrieval line
Coming from the jammer, it comes straight down to a small block located at the front of the cockpit - we've put ours on the same fitting as the toestraps. There are several other blocks that it is then designed to go through. For a properly rigged Laser 2, looking at the cockpit from the front of the boat, it travels from the mast, down through the block we've already discussed, along the middle of the cockpit, through a small pulley block attached to the main sheet block spring, through a small pulley block attached to the back of the cockpit (again to the toestrap fixing point), then back along the length of the cockpit along the right hand side, where it's picked up as the retrieval line, and attached to the spinnaker. You can see this in Photos 79, 80, 81, 83, 84 and 85.
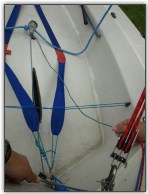
Photo 86, Spinnaker halyard and retrieval line (shortened)
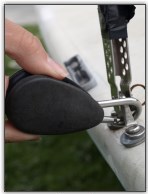
Photo 87, Spinnaker sheet block
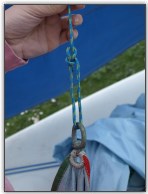
Photo 88, Attach the halyard
However, on the few occasions we've tried this arrangement, it's caused issues, typically the longer the line in the cockpit, the more chance of it getting snagged on something or sat on (small cockpit, it's difficult to avoid sitting on things). Most asymmetric boats with spinnakers have their halyard/retrieval line only traverse the front half of the cockpit, so that's what we've done in Photo 86. We have the blocks in the same places, but we miss out the block at the back of the cockpit, so it only travels down to the mainsheet and back, and has less opportunity to get trod on or snagged. We're not entirely sure if this is in contravention of the class rules, so check before you make this minor change for class racing.
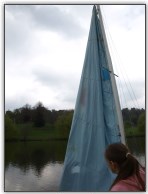
Photo 89, Partially hoist the spinnaker
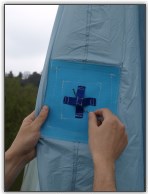
Photo 90, Pass the retrieval line through the first patch
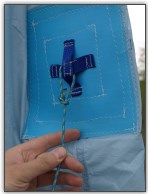
Photo 91, Attach the retrieval line to the second patch
The rest of our setup for the spinnaker is fairly standard. We have a pulley block on either side of the boat, attached to the chainplates for the shrouds with a shackle, as shown in Photo 87. The end of the halyard (that hopefully you didn't lose inside the mast as it's a pain to get through again) is attached to the head of the sail with a bowline, as shown in Photo 88, and the sail is then partially hoisted (Photo 89). The retrieval line that has been fed around the cockpit is fed up through the middle of the first patch (Photo 90), and then attached to the second with a bowline (Photo 91), as the Laser 2 has two retrieval patches. This is just to make getting it down a little easier as it has a fairly big belly. When done, hoist the sail up all the way (unless it's too windy).
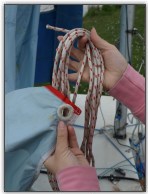
Photo 92, Match sheet colour to sail corners
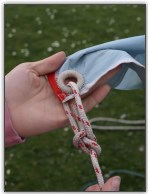
Photo 93, Attach the spinnaker sheet with a bowline
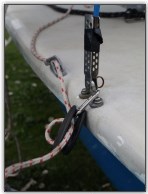
Photo 94, Through the jammer blocks and cleats
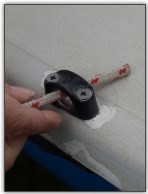
Photo 95, Through the fairlead
Photo 96, Attach the other sheet
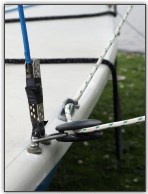
Photo 97, Through the jammer and block
Next, attach the sheets; we have ours colour coded, white rope with red flecks for port, and green flecks for starboard (shown in Photos 92, 93 and 96). As the corners of the sail are colour coded, it makes everything a little easier. The spinnaker sheets are easily attached with a bowline (Photos 93 and 96). The sheet is then fed through the spinnaker jammer blocks just in front of the shroud chain plates (Photos 94 and 97), through the blocks attached to the chainplates, and then through the external bullseye halfway back along the deck (Photo 95), and into the cockpit. You can see the fully hoisted spinnaker in Photo 98. Make sure you rig all of the spinnaker lines outside of the jib sheets - for this reason it's best to have the jib rigged up first.
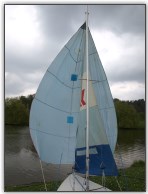
Photo 98, The spinnaker hoisted and ready
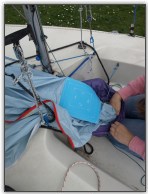
Photo 99, Pack the spinnaker
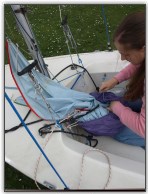
Photo 100, Practise this lots
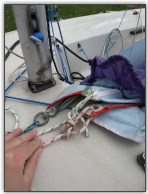
Photo 101, The sheets and halyard go in last and stick out
Finally, drop the sail, and stuff it into the spinnaker bag (Photo 99). The belly and retrieval patches should go in first, followed by the three corners last, with the corners and their attached rope sticking out of the mouth of the bag, free and ready to hoist, as shown in PHotos 100 and 101. As we mentioned before, you can get Laser 2 with spinnaker chutes - we tried to modify ours, and attached a fabric spinnaker chute from a Dart 16, which is about 4 feet long and made out of grey shiny material. Unfortunately as it was relatively new, and the spinnaker was also fairly new, there was too much friction between the two, and the spinnaker would only pull in about 2 feet, so it didn't really work. Sailing's all about experimenting :)
There are two final things for the spinnaker - firstly, the spinnaker pole should be attached to the boom. In Photo 4, you can see two grey things, one either side of the boom, about 2/3rds of the way down the boom. These are very similar to short off cuts of fairly narrow guttering, riveted to the boom. The pole pushes through one of these, then is held to the end of the boom using a small elastic bungee tie, similar to those you get on marquees. The other thing is the spinnaker pole uphaul/downhaul. There is a metal fairlead half way up the mast. To this we have attached a length of elastic, which ends in a stainless steel S-hook. This elastic is short enough to be under tension enough so that when it attaches to the small fairlead half way down the spinnaker pole, it pulls the pole up (even when it is under load of the spinnaker). This S-hook also has a length of 5mm rope attached to it, which comes down from the hook, through a v-jammer cleat on the mast (there is one on the front that can be used), and this will now act as a pole uphaul/downhaul. When not in use, clip it onto the spinnaker pole ring on the front of the mast.
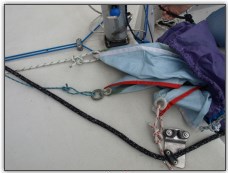
Photo 102, Ready to hoist when on the water
So there you have it - this was a long one, as we said - there's lots of things to play with on a Laser 2. There are various different models, but many of them will have the features described above, and if you have one that has anything extra we'd be happy to receive photos to add to this guide. Enjoy sailing your Laser 2!